Tools that I use in my work
While I primarily work on robotics and embedded systems, I regularly use many software tools in my work. I find all of these fascinating, and would like to share that with you, and I hope you find something useful here. The content is specifically structured to target beginners and common issues not addressed in most tutorials.
In most cases I provide multiple resources for each tool/concept, so you can pick the one that suits you best (or pick the first if you cannot decide). You do not have to go through all of them.
Note that nothing here is sponsored, and I am not affiliated with any of the companies that make these tools. I just like their products.
Table of Contents
- Sorting out environments, source code, and executables
- Git for source control
- Where does the need for Git come from?
- Conventional history tracking tools
- History tracking in source code with Git
- The
.gitfolder and the working directory - Online services
- Workflow with Git hosting services
- Integration with your IDE/editor
- Best practices
- Resources to understand what Git is
- Resources to learn how to use Git
- Important concepts you should look into
- Resources for standard practices and workflows
- Interesting titbit
- Docker, for isolating your development environment
Sorting out environments, source code, and executables
Did you just download an editor, wrote some code, and now you’re wondering why it doesn’t run? You’re not alone.
Among beginners, one of the most common frustrations I’ve seen has to do with actually setting up your computer to write and run code. Generally speaking, there are three solutions commonly presented to people:
- having someone else set up the environment for you
- using an online system, where everything is set up for you
- using an IDE (Integrated Development Environment), where everything is set up for you in one consolidated program.
However, in the real world, knowing how and where to run your code seems to be fairly important. It may not be on a personal computer at all. Often it’s a server where the only available interface is a command line. Another common one is inside another file (such as a Dockerfile, or another configuration file). Personally, I’ve often had to run on embedded targets like Raspberry Pi, or Arduino boards. In these cases, you need to know how to set up your environment, and how to run your code.
Let’s clearly lay out what computers do fundamentally, how this ties in with coding, and how you can get a computer to run your code.
Make sure you install each of the following:
- a text editor/IDE
- the build tools for the language of your choice
- any extensions for your editor/IDE that you need to use the build tools
The only type of file a computer can actually run is an executable binary file.
In general, a file may contain either data or instructions. A file that contains instructions is called an executable file. A file that contains data is called a data file. A computer can only run executable files. All other files are just data that can be read by a program, but not executed. Typically, the “instruction files” are binary files, and we call them executables.
Your computer cannot run your source code without the help of another program, typically called a compiler or interpreter.
More details and further resources
Deeper dive into types of files
- File
You probably already know this. To use a definition, a file is a file is a collection of computer data that forms a single unit and is given a particular name [Britannica]. All your documents, code, apps, photos, videos, songs etc that are stored on computers are in fact files.
- Binary file
Fundamentally, files are of two types to a computer. A binary file is a type of file that contains data in a format that can be understood by a computer, unlike a text file that has characters encoded with a scheme like ASCII or UNICODE. For example, the number 23 would stored as a separate “2” and a “3” in a text file (2 bytes long), but in a binary file it would be converted to a sequence of bits that represent the value 23 (1 byte long).
- Executable file
An executable file is a binary file that contains instructions that a computer can execute. These instructions are encoded in a format that the computer can understand. This is the only type of file that a computer can actually run. All other files are just data that can be read by a program, but not executed.
However, you may have noticed that when you double-click a file (such as a document or an image), it opens. However, most computers just happened to be configured that way for convenience. In reality, the computer is running a program that can read the file and display it to you. That program is an executable binary, and it helps the CPU process the file for you. Your source code behaves in much the same way, and typically needs some other executable to process it.
Further resources
IDE vs Compiler/Interpreter vs Source Code vs Terminal
If you take any formal computer science course, you might hear about two ways of converting your code (such a C++, Python, or Java source file) into something a computer can understand: using compilers or interpreters. In both cases, you use an executable with your source code. That executable then either runs your code (interpreter case) or gives you another executable you can run (compiler case).
This process is independent of your IDE/editor. You must have the interpreter/compiler installed in order for your editor to be able to do anything with it. Your editor is just a tool that helps you write code.
IDE vs text editor
To be completely honest, this is true for text editors, but an IDE (integrated development environment) is a different story. An IDE is a program that combines a text editor with a compiler/interpreter, and other tools. In this case, the IDE automatically installs the compiler/interpreter and often runs is behind the scenes too. That said, the distinction between text editors and IDEs is often blurred for modern software. Read more
If we look at a command line interface, we can see this very clearly. We can run our code, and then use the ls command to see the files in our folder.
Interpreted example: Python
Let’s say I have the following source code in a file called hello.py. Don’t worry if you don’t understand it, it’s just a simple Python program that writes the text “Hello, world!” to the screen.
print("Hello, world!")
The Python interpreter I have installed on my computer is called python3. I can use it to run my code.
$ python3 hello.py
Hello, world!
Notice that it doesn’t generate any files. It just runs my code.
$ ls -l
total 4
-rw-rw-rw- 1 eo eo 29 Oct 22 06:59 hello.py
See what happens here. An executable called python3 is run, and it takes one argument: hello.py. The first argument is the source code file, and the second argument is the name of the executable file that will be generated. The interpreter then runs my code.
Compiled example: C++
This is a little bit more elaborate, but let’s go through it step by step.
Let’s say I have the following source code in a file called hello.cpp. Don’t worry if you don’t understand it, it’s just a simple C++ program that writes the text “Hello, world!” to the screen.
#include <iostream>

int main() {
    std::cout << "Hello, world!\n";
    return 0;
}
The C++ compiler I have installed on my computer is called g++, and is a part of the GNU Compiler Collection. I can use it to compile my code into an executable binary file called hello. I can then run this file to execute my code.
$ g++ hello.cpp -o hello
As expected, I have two files in my folder now: hello.cpp and hello.
$ ls -l
total 20
-rwxrwxrwx 1 eo eo 16384 Oct 22 07:04 hello
-rw-rw-rw- 1 eo eo    87 Oct 22 07:04 hello.cpp
See what happens here. An executable called g++ is run, and it takes two arguments: hello.cpp and -o hello. The first argument is the source code file, and the second argument is the name of the executable file that will be generated. The compiler then generates an executable file called hello, which I can run.
$ ./hello
Hello, world!
So what does this mean for you?
If you have understood up till this point, congratulations! These concepts are often fairly confusing, and it’s completely okay if you don’t understand them yet. You’ll get it eventually, once you have some more experience of software development.
That being said, these give us a fundamental understanding which we can build upon to set up a computer for development.
You can, of course, do things differently, but I would recommend the following approach to setting up your computer to learn most languages:
- Install a text editor/IDE. I use Visual Studio Code, but you can use any editor you like. Check out my older article on editors for more details.
- Install the build tools for the language of your choice. The term “build tools” or “SDK (software development kit)” are general words for a bunch tools, crucially including the interpreter/compiler that you need to run your code. The steps to do this vary both from one language to another, and from one operating system to another. In general, search for what you need, and follow the instructions. If you’re using an IDE, it will often do this for you.
- [IF RELEVANT] Set up your text editor/IDE to use the build tools.
- If you use a text editor like VS Code, vim, Notepad++, or any of the hundreds of others, you will need to set it up to use the build tools. Often you do this by installing the relevant extensions in your editor. Look up a tutorial online for configuring this.
- If you installed an IDE like Visual Studio or one of the JetBrains IDEs instead, it will likely have done this for you. If not, look up a tutorial online for configuring it.
- Make projects in folders, not files. This is a good habit to get into, and will help you keep your code organized. It will also help you if you ever need to use a build system like Make or source control tools. I recommend you make a folder for each project, and put all the files for that project in that folder. This includes your source code, any libraries you use, and any build files. Additionally, most IDEs/editors are designed with larger projects in mind, and will work better if you use them this way.
Exceptions
Many systems (especially proprietary ones) have their own way of doing things. For example, MATLAB has its own IDE, and you can’t really use it without it. Similarly, Arduino has its own IDE (even though it is open-source). Then there are things like LabVIEW, which aren’t traditional text-based languages to begin with. In these cases, you will have to use the IDE, and it will take care of everything for you.
Resources
I’ll list out what I consider the best resources for some of the most common languages, but this obviously doesn’t cover every use case, so you’re generally better off searching for what you need.
- Learning Programming
-
- r/learnprogramming Wiki: This has curated lists for multiple languages and platforms, and is a great place to start.
- CS50 for CS intro and a little bit C
- CS50P for Python
- Beginning C++ Programming - From Beginner to Beyond on Udemy by Tim Buchalka
- Java from Oracle
- C# from Microsoft
- Web Development from Mozilla
- Tooling
-
- Missing Semester by MIT CSAIL
- Bash in 100 Seconds by YouTube channel Fireship
-
Setting up languages in VS Code: The VS Code team has documented the process of setting up the following languages with their editor (at the time of writing):
C++, C#, CSS, Dart, Dockerfile, F#, Go, HTML, Java, JavaScript, JSON, Julia, Less, Markdown, PHP, PowerShell, Python, R, Ruby, Rust, SCSS, T-SQL, TypeScript
Ensure that you follow through with the process they describe, and don’t just install the extensions. This is because the extensions often require the build tools to be installed, and will not work without them.
Git for source control
Many programmers have heard of Git, and the related online services like GitHub, GitLab, and Bitbucket. Yet many beginners struggle to use it effectively, and there seems to be need for a standard explanation of how these different tools fit together.
- Git is just a tool (an app, if you will) that tracks changes to a project
- GitHub, GitLab, and Bitbucket are online services that host Git repositories
- The
.gitfolder makes a project folder a Git repository, and contains all the history and metadata needed for the Git tool to work- These services provide a way to share your code with others, and use cloud storage without grappling with traditional cloud storage services like Google Drive or Dropbox. They “understand” the
.gitfolder to provide a web interface to the Git repository
Where does the need for Git come from?
How often have you had to deal with this?

I did pretty often. I’ve often lost track of which version of a document was the latest, and which one was the one I was supposed to be working on; and on occasion, I’ve even lost weeks of work because I accidentally overwrote a file.
Any of you that have used Google Docs or similar online tools would be laughing at me right now. But how do you do the same thing for any file on your computer, not just the ones that are supported by Google’s office suite? This doesn’t make sense for a document, but for a technical project, you could very well have multiple versions that are developed in parallel, and you need to keep track of all of them.
Enter Git. Git is a source control system that allows you to keep track of all the changes you make to a file, and revert to any version you want. It’s also great for collaborating with others, as it allows you to merge changes made by multiple people to the same file. It’s by far the most popular version control system (VCS) out there today.
The rest of this explanation is fairly theoretical. If this is the first time you’re trying Git, I would recommend you to use the standard resources I’ve listed below to get some hands-on experience, and then come back to this section if you find yourself struggling with something. These resources are tried and tested, and will will get you up and running.
Conventional history tracking tools
If you’ve ever used tools like Google Docs, you’re already familiar with the basic idea of tracking changes.
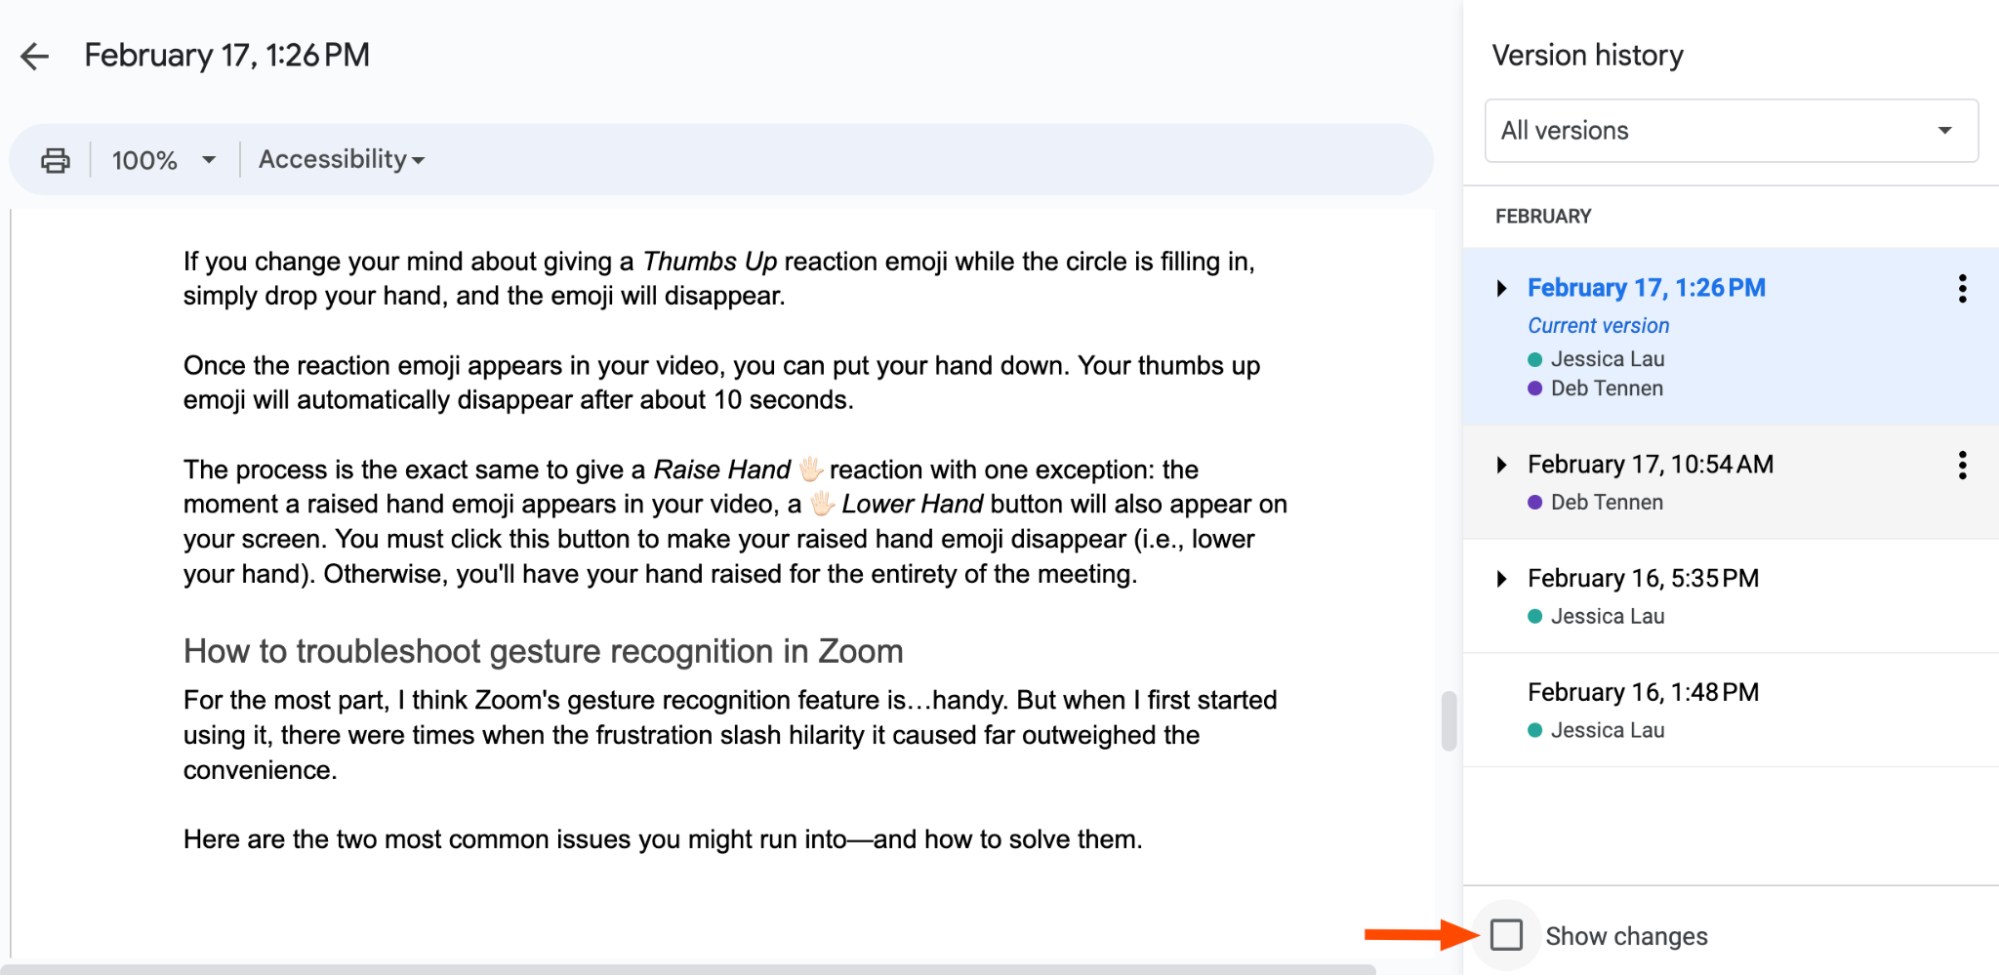
Source: Zapier
When you make a change, the software records the change, who made it, and when. In the case of the Google Workspace suite, all of this is neatly packaged in a single file (the document). You’re free to view this history, and even revert to an older version if you want.
Read more from Google’s support page.
History tracking in source code with Git
However, software (source code) files are a little different. Firstly, they’re very simple text files so it is impractical to integrate something as complex as a history pane into the file itself. Secondly, software projects are often made up of many files.
Therefore, most version control systems (like Git) store the history in a separate location, and provide a way to view and revert changes across many files. In fact, Git is capable of keeping track of content (such as a variable or function name) across the various files in a project [source]. In the case of Git, this history is stored in a .git folder in the root of the project. You can see that I have one even for this website:
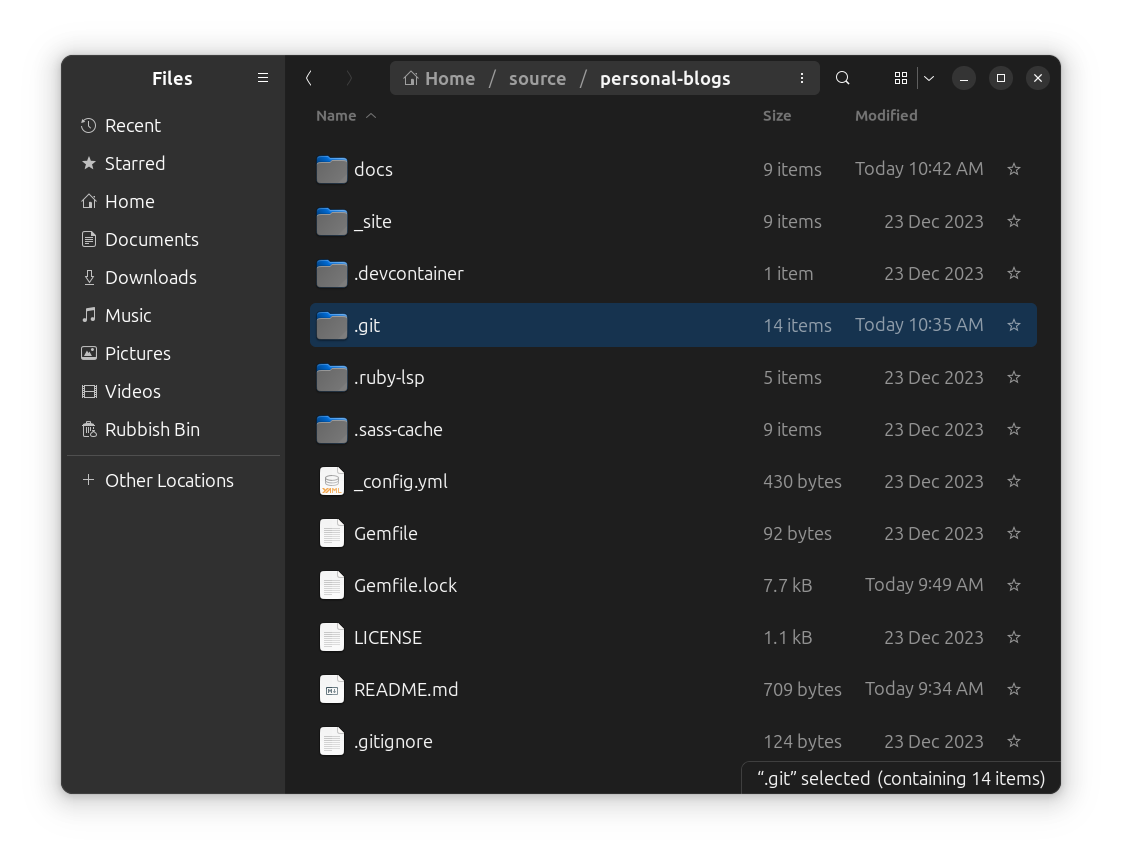
The .git folder and the working directory
If you wanted to share a Git repository with someone, sharing this folder alone is technically sufficient. It contains all the history and metadata (among other things) needed to work with the project, up to the latest commit in every branch. You may enjoy seeing the contents of this folder, and can read about that from Stack Overflow or Git’s documentation (though it’s not necessary to understand these details to use Git).
The rest of the root folder contains the actual files of the project, and is called the working directory. You make changes here, and then commit them to the history using the git command line tool. Additionally, if you want to switch to a different version of the project, you can checkout a different branch or “commit”. Git then updates the working directory to match the version you selected.

Source: Git documentation
Online services
GitHub, GitLab, and Bitbucket are online services that host Git repositories. They provide a way to share your code with others, and use cloud storage without grappling with traditional cloud storage services like Google Drive or Dropbox. They also provide a way to view the history of a project, and to collaborate with others. They do this by providing a web interface to the Git repository, and by providing a way to clone the repository to your local machine.
The web interface analyses the contents of the .git folder (optionally, alongside other data), and visualizes many aspects of the project. For example, you can see the history of the project, the different branches, and the changes made in each commit. You can also view the contents of the working directory at any point in the history.
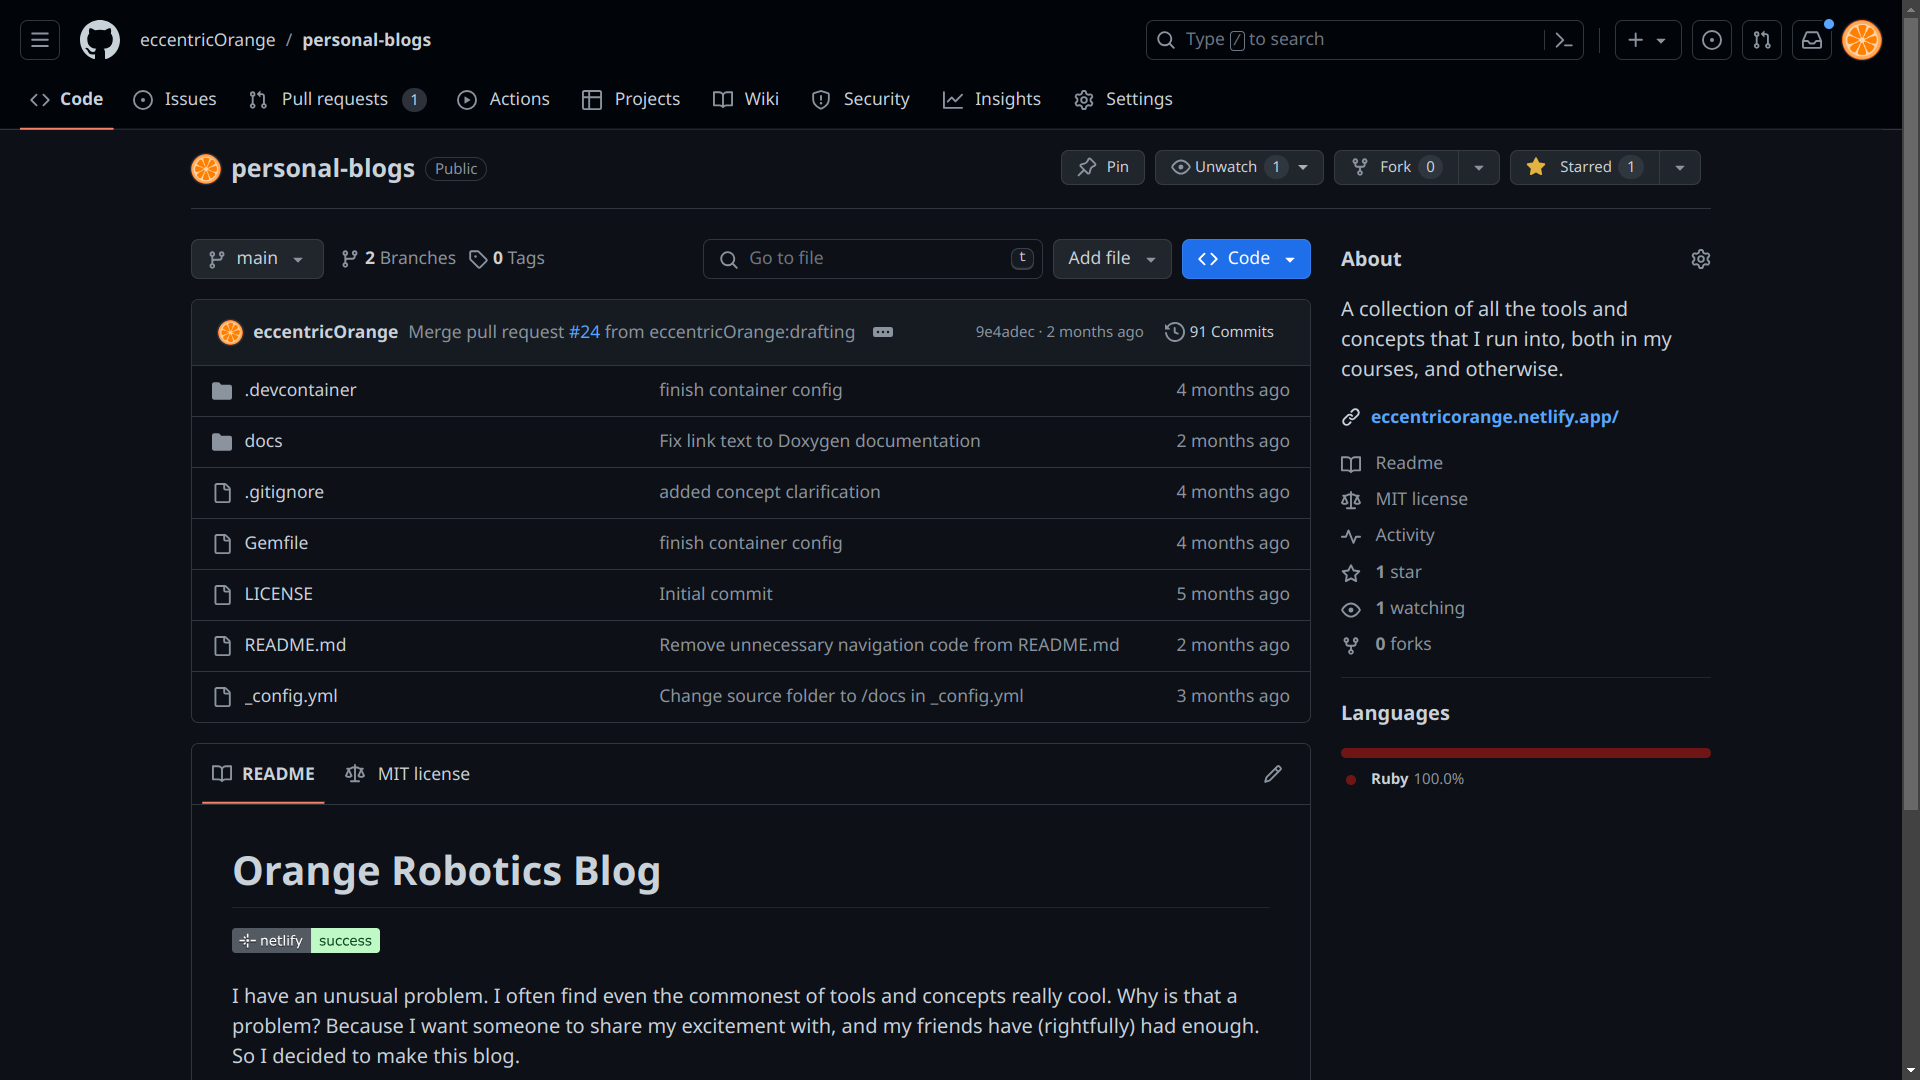
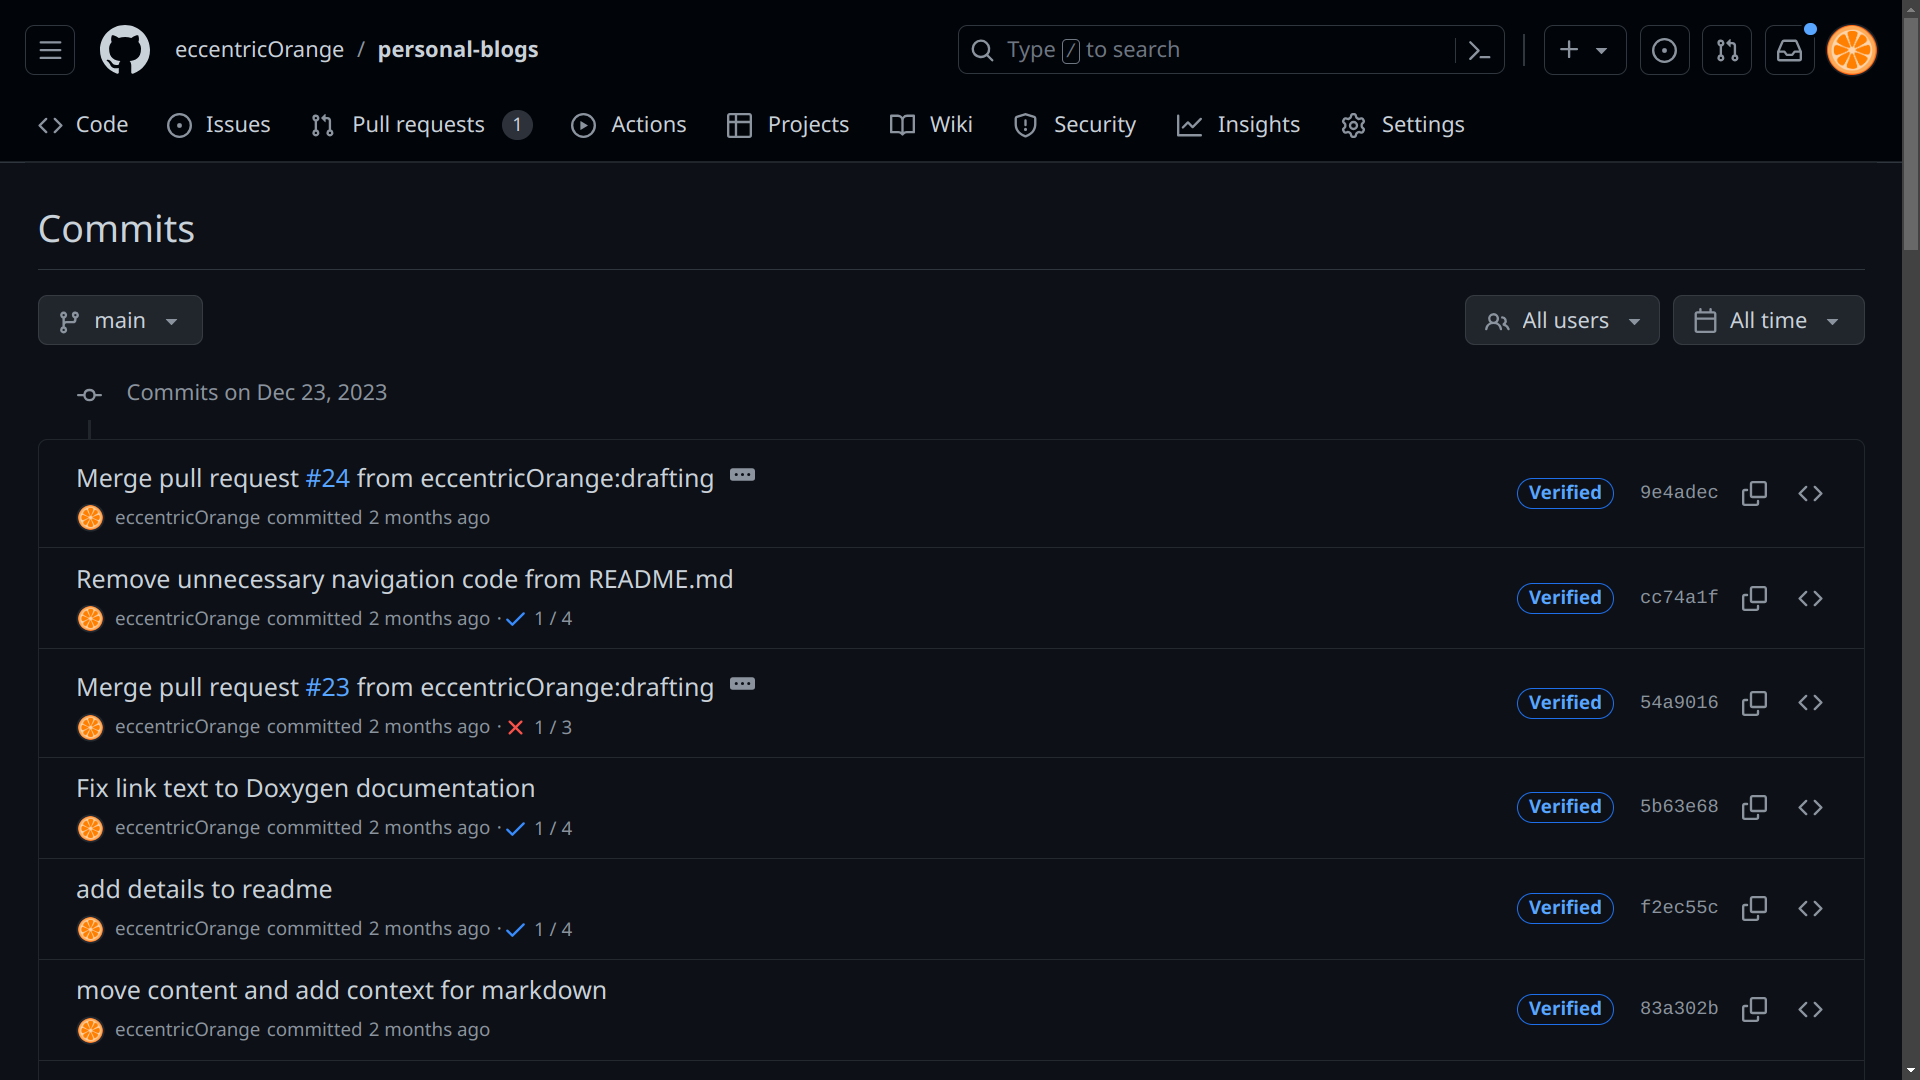
Source: GitHub (this blog’s repository)
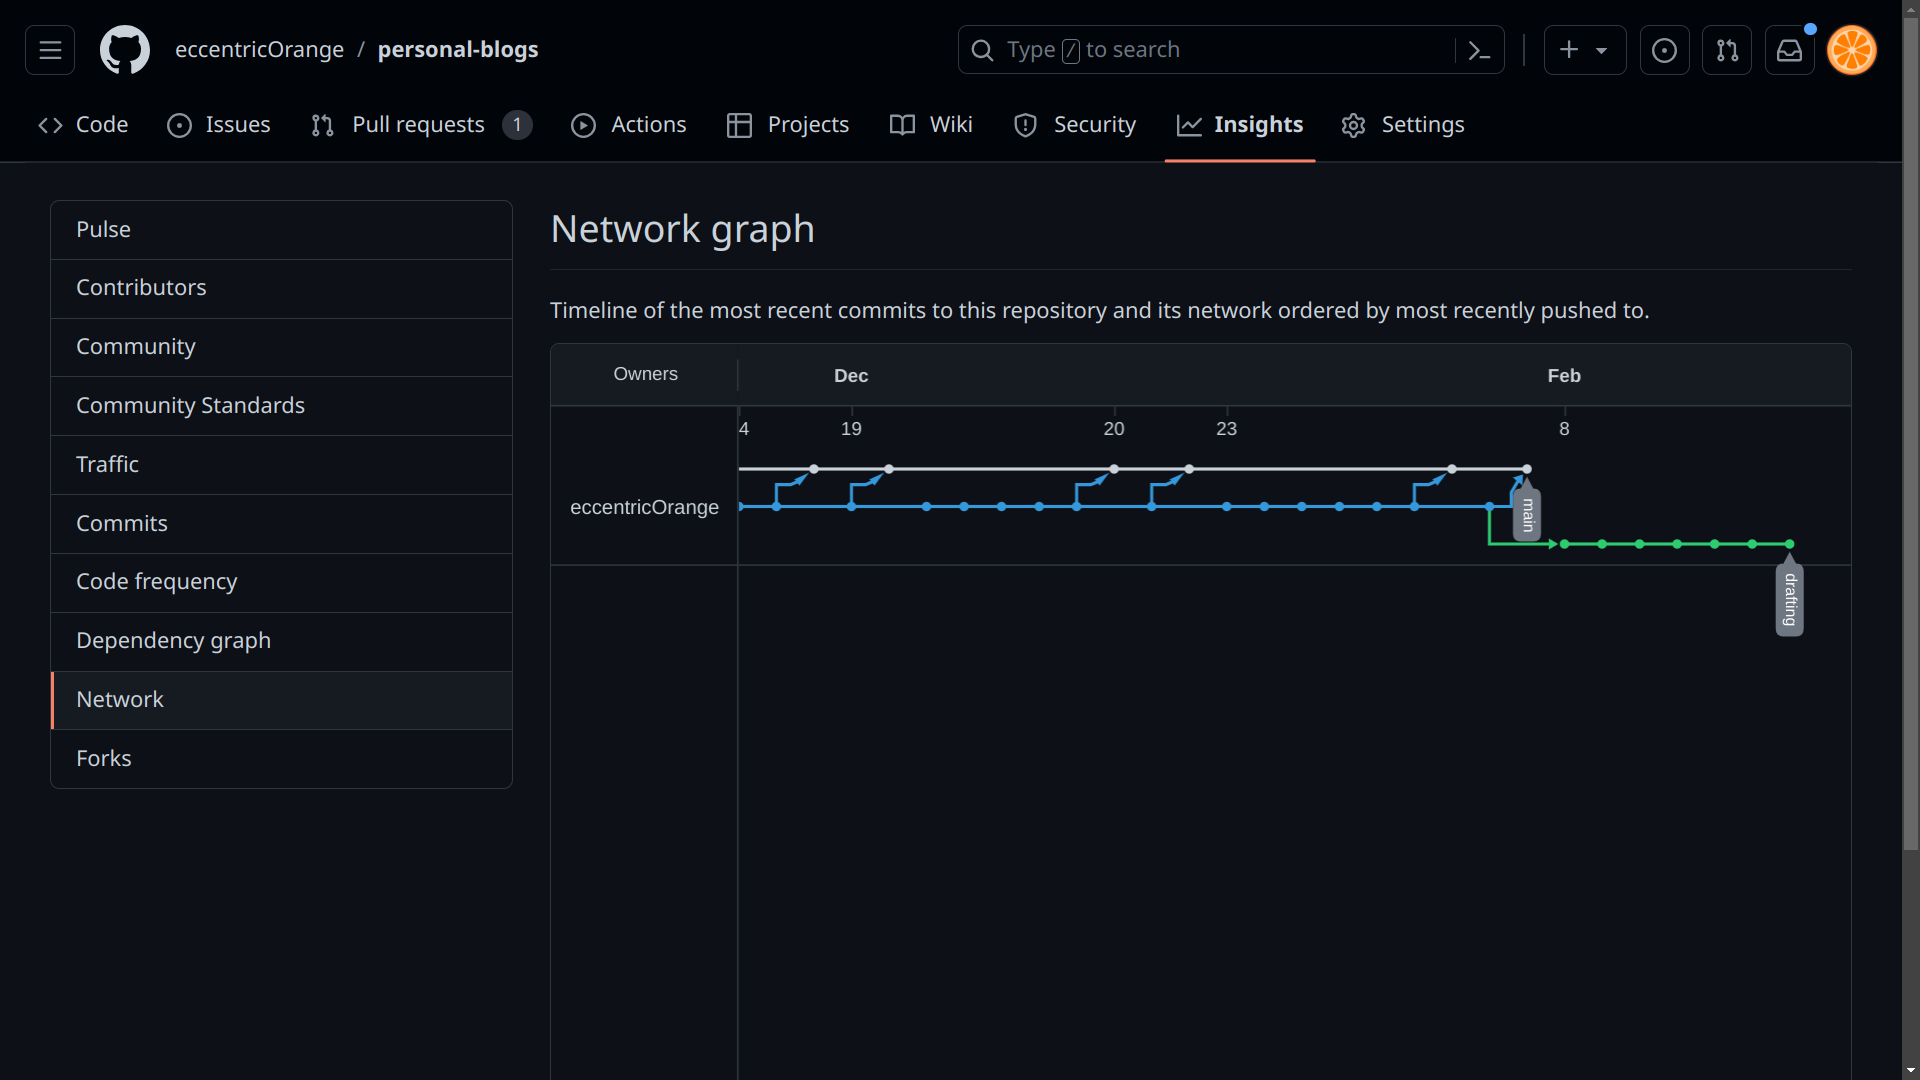
Workflow with Git hosting services
When you “clone” a repository, you download a copy of the history (.git folder) and working directory to your local machine. You can then make changes, and push them back to the online repository. You can also “pull” changes from the online repository to your local machine. Look into workflows to learn more.

Source: Reddit
Most of these websites also provide tons of services aside from hosting code and collaborating. Check those out on their respective websites:
Integration with your IDE/editor
Many IDEs and text editors have built-in support for Git. This means you can view the history of a project, make commits, and push/pull changes without leaving the editor. This is a huge productivity boost, as it means you don’t have to context switch between the editor and the command line.
Generally speaking, these provide a GUI (much like one of the hosting service websites). Under the hood, they’re often just running the same git commands that you would run in the command line, though. Moreover, for advanced functionality, you may still need to use the command line, so it’s a good idea to learn the basics of Git.
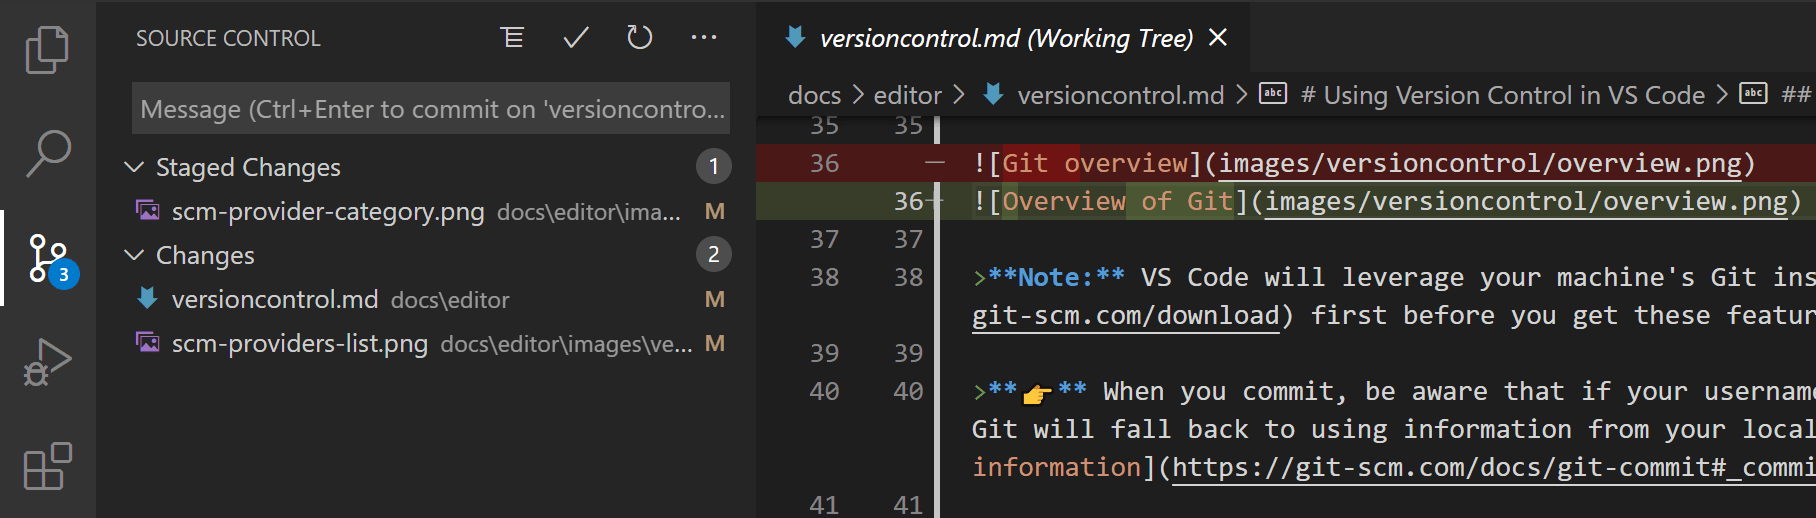
Source: VS Code documentation
Best practices
There are a few practices that are generally considered good when using Git, and will help you avoid trouble, especially as a beginner (they at least help me). These are not hard rules, and experienced developers will often rightly break them, but they are a good starting point:
-
Make small, frequent commits
This makes it easier to understand what’s going on, and to revert specific changes if something goes wrong. You can also merge changes from different branches more easily, especially if you’re working with others.
-
Use branches
Branches are one of the core features of Git and let you maintain various “draft” versions of a project, alongside a “main” version. This allows you to work on different features of the project at the same time, and to experiment without breaking the main version of the project.
The expectation is that you will eventually merge these branches with the main version of the project (as opposed to permanently using different branches for unrelated code).
-
Use one repository per project
This has more to do with IDEs and other tools than Git, but they all go hand-in-hand. Uploading several projects in the same repository can make it difficult for developer tools to index your files to understand your projects. Of course, there are ways to work around this, but it’s generally easier to just use one repository per project.
It also makes it easier to use the project with build systems like Make, and with other tools like Docker.
-
Use a
.gitignorefileThis is a file that tells Git to ignore certain files and folders. This is useful for files that are generated by your build tools, for files that contain sensitive information (like passwords and security keys), or for dependencies (such as
node_modulesor__pycache__). It’s also useful for files that are specific to your computer, and not relevant to the project (like.DS_Storefiles on macOS), or personal preferences (such as IDE theming). -
Pay attention to the remote URL in Git
This is the URL of the online repository. It’s important to set this correctly, as it’s the URL that Git will use to push and pull changes. But you can also leverage this to use multiple online hosting services, or to use a different URL for different purposes (I use this to handle two remotes, with one serving as a back-up).
Resources to understand what Git is
Just pick any of these and read/watch it, these are just an overview.
- Atlassian article on version control
- Wikipedia article on version control
- Atlassian article on Git
- Git Explained in 100 Seconds, YouTube video by Fireship
Resources to learn how to use Git
Pick whatever you’re most comfortable with.
- Git & GitHub Tutorial for Beginners, YouTube playlist by Net Ninja (this is what I used when I learnt Git)
- Getting started with Git and GitHub, article by GitHub
- Git It? How to use Git and Github by Fireship on YT
- Official Git documentation
- Pro Git, Scott Chacon and Ben Straub for Git SCM
Important concepts you should look into
Perhaps not initially, but try to get through all these concepts to using Git effectively.
- GitHub/GitLab or other Git hosting services
- Git branching
- Issues and pull requests
- The
.gitignorefile - Resolving merge conflicts
Resources for standard practices and workflows
These likely aren’t going to be useful initially, but they’re good to know about. Many of these can help save hours of headaches or deal with lost content.
- What are Git version control best practices?, GitLab
- Best Practices for Using Git, FCC
- Comparing Git workflows, Atlassian
- GitHub flow, GitHub
Interesting titbit
Tech Talk: Linus Torvalds on git, YT video by Google
Linus Torvalds visits Google to share his thoughts on git, the source control management system he created.
Docker, for isolating your development environment
Dependency hell is a problem that arises when you have multiple projects that depend on different versions of the same library, different operating systems, or otherwise different systems. For example, you might have one project that depends on version 1.0 of a library, and another that depends on version 2.0. If you install both of these on your computer, you’ll run into problems, because the two versions of the library might not be compatible with each other. In fact, you may not be able to install them together in the first place.
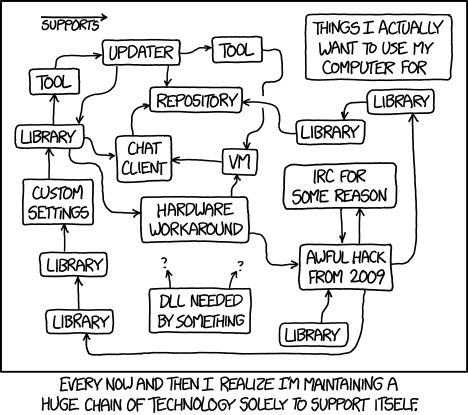
Source: xkcd 1579
Docker is a tool that allows you to isolate your development environment from the rest of your computer. You start from a bare environment; for example, an installation of a Ubuntu system:
FROM ubuntu:22.04
An example of a complete Dockerfile
FROM python:3.10.4

# build and install SQLite because >=3.35 is needed
RUN wget https://sqlite.org/2022/sqlite-autoconf-3380500.tar.gz
RUN tar -xvf sqlite-autoconf-3380500.tar.gz
WORKDIR sqlite-autoconf-3380500
RUN ./configure
RUN make
RUN make install
RUN export PATH="/usr/local/lib:$PATH"

# get python requirements
ADD requirements.txt requirements.txt
RUN pip install -r requirements.txt pytest
Source: My own project, NPBC
There are many more options, such as different OSes, images with certain toolchains built-in, lightweight ones et cetera. You can check out the Docker Registry for a complete listing.
Crucially, whenever you start from a certain environment (image), so does everyone else using your “Dockerfile”. This means that you can be sure that everyone is starting from the same point, and that everyone has the same environment. This is great for reproducibility, and for making sure that your code works on other people’s computers.
Docker vs Virtual Machines
On the surface, Docker containers behave like virtual machines. But Docker containers share the same kernel as the host system, which means that they are more lightweight than virtual machines.
Read more:
Resources to understand what Docker is
Pick any of these and read/watch it, these are just an overview.
- Official Docker documentation
- Wikipedia article on Docker
- Docker Explained in 100 Seconds, YouTube video by Fireship
- IBM article on Docker
Resources to learn how to use Docker
Pick whatever you’re most comfortable with.
- Official Docker documentation
- Containerize your application, article by Docker
- Docker Tutorial for Beginners, YouTube playlist by Net Ninja
- you need to learn Docker RIGHT NOW!! // Docker Containers 101, YouTube video by NetworkChuck
- Docker Crash Course for Absolute Beginners [NEW], YouTube video by TechWorld with Nana
My recommended way to learn Docker
Follow some of these resources to understand concepts and install the tool. Even play around with it a bit.
But don’t spend too much time on it, as there isn’t really much you can do with Docker without an appropriate project. Instead, begin to get into using virtual hosts, such as through GitHub Codespaces, where Docker is going to be genuine useful.
Look into using Docker Devcontainers with VS Code. Initially, you can rely on the pre-built Dockerfiles and images, and then you can start to build your own as you get more comfortable with it. Read more: Developing inside a Container.
Interesting titbits
It will likely be a while before any of these are useful (or practical to even play around with) for most people, especially when getting started. But they all are commonplace in the industry, and interesting in their own right.
- Top 8 Docker Best Practices for using Docker in Production, video by TechWorld with Nana
- Docker Compose, for managing multiple containers simultaneously
- Docker Swarm, for managing multiple containers across multiple hosts
- Kubernetes, for managing multiple containers across multiple hosts, with more features than Docker Swarm